Showing posts with label Design Team. Show all posts

Sunday, October 6, 2013

2nd Mixed Media Project by Kim Greenfield

Good Evening Bloggers:

Today we are releasing the 2nd Mixed Media project from Kim Greenfield of our Design team. This project along with the other projects are on shelves to the left of the register. Our Design Team is doing an awesome job on these projects and have inspired others to think outside the box!  Please feel free to ask any of our Staff for information on the products that were used on these projects. 


ATC Frames by Kim Greenfield
 
 
Supplies:
 
LYB Burlap Chip Album
Adorn It Fabric
G45 Metal Butterflies
Petaloo Stick Pins
Thickers
Tim Holtz Tissue Tape
Tim Holtz Tattered Florals & Tattered Leaves Dies
Tim Holtz Distress Stains
Tim Holtz Distress Paint
Tim Holtz Clear Rock Candy Crackle Paint
Creative Imaginations ATC Frames & Die Cuts
Creative Imaginations Stencil
Ric Rac
Yupo Paper
Alcohol Ink
Dylusions Sprays
Paper Towels
Claudine Helmuth Sticky Back Canvas
Twine
Liquitex Light Modeling Paste
TH Distress Reinkers
Claudine Helmuth Multi Medium
Glossy Accents
 
 
I decided to use the frames to showcase just a few of my favorite techniques that I've learned from some very talented people.  I started out by covering the chipboard pages with fabric and tissue tape, then I dry brushed paint on the inside front and back covers.
 
COVER:  I ran the butterflies through my Big Shot with a Cuttlebug embossing folder, then used alcohol ink on them.  I finished them off by adding the stick pin bodies before attaching them to the cover.
 
TITLE PAGE:  I cut fabric and vellum with my Big Shot using the Tattered Florals die.  Then I stained them and attached a rhinestone center.
 
CLEAR ROCK CANDY:  I'm sure I've mentioned it before, but I really love this stuff!!  This time, I cut the flowers from thin chip and covered them with a thick layer of Rock Candy.  To get the effect shown here, its best to let it dry completely on its own.  For the less than patient (which includes me sometimes!) you can use a heat gun to speed up the process AFTER it starts to crack on its own.  Using the heat gun, you'll get finer cracks.  Once it was completely dry, I used Distress Stains on them (a very cool technique I learned during an online class I took with Tim Holtz!)  I also used the Stains on the ric rac stems.
 
DYLUSIONS SPRAY:  I learned this technique during an LynnMarie's class and love the effect!!  I took some paper towels, sprayed them with the ink and zapped them with the heat gun.  Once they were completely dry, I peeled off the top ply and stuck it on Sticky Backed Canvas before running it through my Big Shot using then Tattered Leaves die.  Then I covered them with a thin layer of Clear Rock Candy.
 
ALCOHOL INK:  This is another technique I learned from LynnMarie's...painting with alcohol inks!!  Who knew?!  I'm no artist, but the combination of Yupo paper, alcohol ink and the patient instruction of LynnMarie's resulted in me being able to paint more than just stick people!
 
LIGHT MODELING PASTE:  This is some of my favorite stuff to work with!  Thank you, Sue, for introducing it to me.  I mixed a couple of drops of Distress Re-inker in and smeared it through a stencil. 
The background is a print I made using a Gelli Plate (another bit of fun I learned about from Sue!)
 
If you haven't already, try one (or more!) of these techniques in your next project.  You might find a new favorite!!
 
Great Job Kim!  Your projects are so inspiring!


Saturday, October 5, 2013

1st Mixed Media Project by Kim Greenfield


Good Evening Bloggers:

Today we are releasing the 1st of our Mixed Media project from Kim Greenfield from our Design team. This project along with the other projects are on shelves to the left of the register. Our Design Team is doing an awesome job on these projects and have inspired others to think outside the box!  Please feel free to ask any of our Staff for information on the products that were used on these projects. 


Dress Form by Kim Greenfield

Supplies:
Bare Elements Jeramee Dress Form
Tim Holtz Tissue Paper
Tim Holtz Distress Stain Vintage Photo
Tim Holtz Distress Stain Frayed Burlap
Tim Holtz Distress Stain Antique Linen
Adorn It Vintage Groove Fabric
Kaiser Craft Wood Wings Flourishes
Collage Pauge
Tim Holtz Distress Glitter Vintage Photo
Tim Holtz Distress Crackle Paint Rock Candy
Tim Holtz Ball Chain
Tim Holtz Jump Rings
Tim Holtz Enameled Tags
Tim Holtz Remnant Rubs
Glossy Accents
Wonder Tape
Craft Pearls
Ribbon
 
I started out by covering the body with Vintage Photo stain.  I also stained the tissue paper with Antique Linen.  I use Antique Linen on any paper I want to tone down or age a bit--even patterned paper.  I think it gives it a perfectly aged look.  I tore the tissue paper into pieces and used Collage Pauge to place them all over the body. 
 
Once that dried, I painted the top and the base with Rock Candy Distress Crackle Paint.  I broke the cardinal rule by using my heat gun on it, then dabbed Frayed Burlap stain over that. 
 
The wings were coated in Collage Pauge and dipped in Distress Glitter, then set aside to dry.
 
After my wonderful scrappy friends convinced me that I could, I actually sewed the skirt!!  (Please don't tell my husband.  Not that he'd believe it, but still.  Why take the chance.)  I attached the pearl trim to the ribbon with Glossy Accents and added it to her skirt using Wonder Tape (red line tape).  I added additional ribbon to the bottom of her skirt.
 
To finish, I used a Remnant Rub on an Enameled Tag, attached a jump ring and hung it on some Ball Chain.  Lastly, I attached her wings with Glossy Accents.
 
I can see this being a super cute project made to match the décor in almost any room at home, or a holiday decoration or part of a seasonal display.  It would also make a great way to present a necklace or bracelet gift, too!
 
Great Job Kim!!!  Love how you used the Crackle Paint!


Wednesday, September 25, 2013

Layouts by Jennifer of our Design Team

Good Evening Bloggers:

Today we are releasing this month's layouts from Jennifer from our Design team. These layouts along with the other projects are hanging up on the wall to the right of the door as soon as you walk into Scrapper's Playground. Our Design Team is doing an awesome job on these projects and have inspired others to think outside the box!  Please feel free to ask any of our Staff for information on the products that were used on these layouts.

Layouts by Jennifer


Back to School

Supplies:

Simple Stories Smarty Pants Orange notebook
Smarty Pants Border and Title Element
Smarty Pants Green Composition
Memento Ink Potter's Clay
Simple Stories Smarty Pants Bingo/Stars Paper
Smarty Pant Horizontal Journal Card Elements
Smarty Pants Chipboard Elements and Stickers
I used the Simple Stories Orange Notebook for my base. I then cut out the school rocks from the border and title sheet paper.  I cut the Smarty Pants Green Composition to 9x7, cut the Smarty Pants School Days to 10x8 and adhered it to base paper. Layer green composition paper on top and add border strip to bottom. I cut out the bingo cards and layered them on the border strip. I cut out the back to school from the horizontal journaling card elements and attached to layout. I attached the green ribbon across the layout and added the name to the pencil. I then embellished with chipboard and sticker embellishments. All paper edges I inked with Memento Ink.


Family
 
Supplies:
My Mind's Eye Adorbs Be Thrive paper
My Mind's Eye Adorbs Be Live Paper
My Mind's Eye Adorbs Be 2x6 Journal Cards
My Mind's Eye Cut and Paste Chipboard Stickers
Mind Mind's Eye Label Stickers
Basic Grey Mini Mono Alphabet Stickers
Bazzill Clear Jewels
My Mind's Eye Cut and Paste Enamel Dots
I cut the Be Thrive paper to 8x8 and matted it with cardstock. I added a 2x8 paper strip of the pattern on the opposite side to the middle. Cut the Be Live paper to 9x9 and mat with cardstock. Mat photo with cardstock and add to layout. Add the journal card, journal and embellish with chipboard stickers and label stickers. Add title with Basic Grey Alphabet. Add clear jewels to center of flowers and add enamel dots to embellish layout.


Great Job Jennifer!

Tuesday, August 13, 2013

Design Team Layouts by Jeanette Giancaspro


Good Afternoon Bloggers:

Today we are releasing this month's layouts from Jeanette Giancaspro from our Design team. These layouts along with the projects are hanging up on the wall to the right of the door as soon as you walk into Scrapper's Playground. Please feel free to ask any of our Staff for information on the products that were used on these cards.

Layouts by Jeanette Giancaspro


Birthday Barbecue

Supplies:

Doodlebug Take Note Collection ~ Letter Stickers, Papers, and Embellishments
Bo Bunny Key Lime Collection ~ Letter Stickers, Phrase Stickers and Journaling Box
Bazzill Cardstock
Brads
Baker's Twine
Basic Grey Wood Veneer Shapes
Basic Grey Number Stickers
Faber Castell Gelatos
Sizzix Balloon Dies


To create the glittered balloons, I die-cut patterned paper and applied dry adhesive to the fronts of the balloons.  (You could use wet glue, but the paper might warp.)   Then I sprinkled fine glitter over the adhesive.


To color the wood veneer shapes, I applied Gelatos directly to the veneer and smoothed them out with my fingers.  


Great job Jeanette!  I love the balloon and the use of the wood veneer shapes!
 

Sunday, November 29, 2009

My Mind's Eye Life Stories by the Design Team Part 1

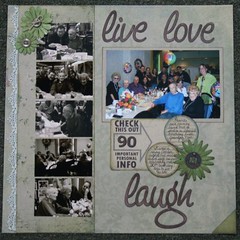
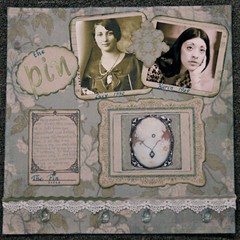
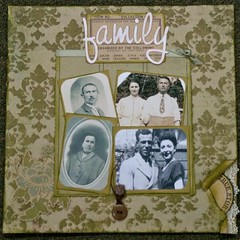
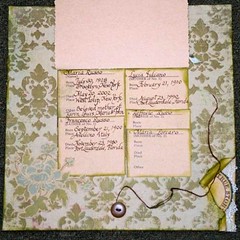
This month we challenged the Design Team with Life Stories by My Mind's Eye. We gave them papers, die cuts, journaling cards, buttons, twine, Prima ribbon and Basic Grey Eerie alphabet stickers. Angie and Karin received the blue-green color scheme and these are their layouts. We found it interesting how they both used hidden journaling. I love hidden journaling because it is so important to record the stories but sometimes the words take away from the design or there isn't enough room (see Karin's Family). It is also important for us to use our handwriting and hidden journaling is a great way to incorporate handwritten journaling when you don't like your handwriting!
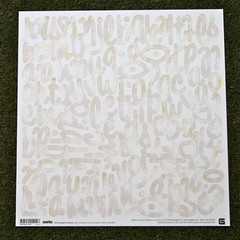
Did you notice how Angie and Karin changed the color of the alphabet stickers? It's very easy and works great on all the light colors. You can use your Copics or inks to change to any color you want to match your layouts. Also notice how Angie used 2 different Thickers: Rainboots and Nutmeg and how she highlighted the Rainboots by outlining them with a journaling pen.

Another interesting element is how Karin used a journaling die cut to highlight her title. The journaling box has nothing to do with the subject matter but it does provide open space to highlight her title without distracting from it.

Although the Design Team is given a specific challenge they are also allowed to use their "stash". Notice how Angie incorporated Tim Holtz Ideology Tokens a a flower center on her "live, love, laugh" layout while Karin added Heidi Swapp Crystals to her ribbon on her "the Pin" layout.

Watch for the red-pink color scheme by Tracey and Chevonne next week.